In this guide
How to Wash a Car Interior: The Honest, Step-by-Step Guide
Search "how to wash a car interior" and you get two kinds of answers. The first is a shopping list disguised as advice: fifteen bottles you supposedly need before you can wipe a single surface. The second is a blur of contradictions, where one page tells you dish soap is fine, the next warns it will ruin everything, and a third has you spraying a shiny dressing on the dashboard that leaves a glare across your windshield the moment the sun hits it. If you just want the inside of your car to be clean, safe to touch, and free of that stale smell, the noise is exhausting. This guide strips it back. It walks through what actually cleans an interior without damaging it, the order that makes the whole job faster and easier, the household shortcuts that are genuinely safe versus the ones that quietly wreck plastics and screens, and how to adapt all of it to the one thing most interior-cleaning advice ignores: the heat, sun, and dust of a climate like Kuwait's. By the end you will know exactly what to do, what to skip, and why each step matters.
Why the inside of a car is harder to clean than the outside
The outside of a car is mostly one material: painted metal, facing one enemy, dirt. The inside is a dozen different materials, each with its own weakness, sitting inches from your face all day. Leather, fabric, soft-touch plastic, piano-black trim, glass, and delicate touchscreens all live in the same cabin, and a product that is perfect for one can permanently mark another. That is the whole reason interior cleaning feels confusing: there is no single "car interior cleaner" that is simultaneously right for a leather seat, a matte dashboard, and an anti-glare display.
Two invisible forces make it worse. The first is static. The plastics and vinyl used across your dashboard and trim build up a static charge that actively pulls dust out of the air, which is exactly why the dashboard is usually the dustiest surface in the whole car Auto Finesse. You are not imagining that it gets dusty faster than anything else — the material is working against you. The second is contact. The surfaces you touch constantly — the steering wheel, door cards, gear shifter, and console — collect skin oils, fingerprints, and grime far faster than anywhere else, so they need attention more often than the rest of the cabin.
This matters for how you clean. You're not "washing" the interior like you hose down the outside. You match a gentle method to each surface, working in an order that stops you from making messes you then have to redo.
The tools that matter (and what to do if you don't own a vacuum)
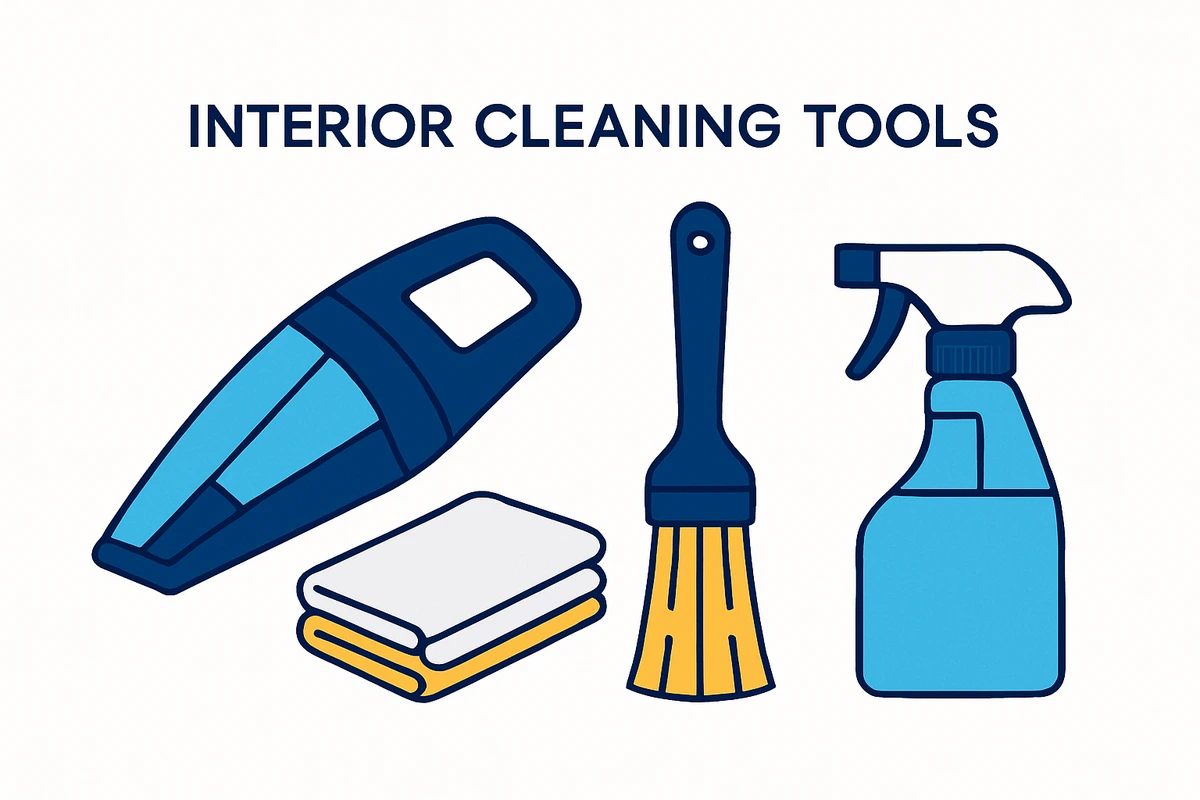
Skip the enormous shopping lists. A genuinely clean interior needs only a small core kit:
Core cleaning kit
- Several microfiber cloths. These are soft enough to wipe most surfaces without scratching them, which matters because the wrong cloth leaves fine marks on glossy trim and screens.
- A soft-bristled brush or an old toothbrush for vents, seams, and cup holders.
- A mild, automotive-specific interior cleaner, plus a dedicated glass cleaner and, if your seats are leather, a leather cleaner and conditioner.
- A vacuum with a crevice attachment if you have one.
That is the whole list. Everything else is optional. Automotive products beat kitchen-sink stuff because many household cleaners contain harsh chemicals that degrade leather, plastics, and cloth over time Car and Driver. We'll hit which household items are safe in a minute, and that's one of the biggest unanswered questions online. The short version: "it's just soap" isn't always true.
A vacuum is the fastest way to lift loose grit, but it is not the only way, and plenty of people cleaning a car at home don't own a car-suitable one. Start by taking the floor mats out and shaking or beating them against a wall outside until the loose dirt is gone. For the carpets and seats, a stiff-bristled brush works the embedded crumbs and grit loose so you can sweep them toward the door and out with a hand brush or a folded microfiber cloth. Work from the top of each seat downward so gravity carries the debris to the floor, then clear the floor last. It is slower than a vacuum and it will not pull dust from deep in the fabric, but for regular upkeep between deeper cleans it is perfectly adequate. The one thing a brush cannot replace is reaching deep into the seat rails and vents, so if you never vacuum, plan on the occasional trip to a self-serve bay or a mobile service that brings suction with them.
Clean top-down, dry before wet: the order the pros use
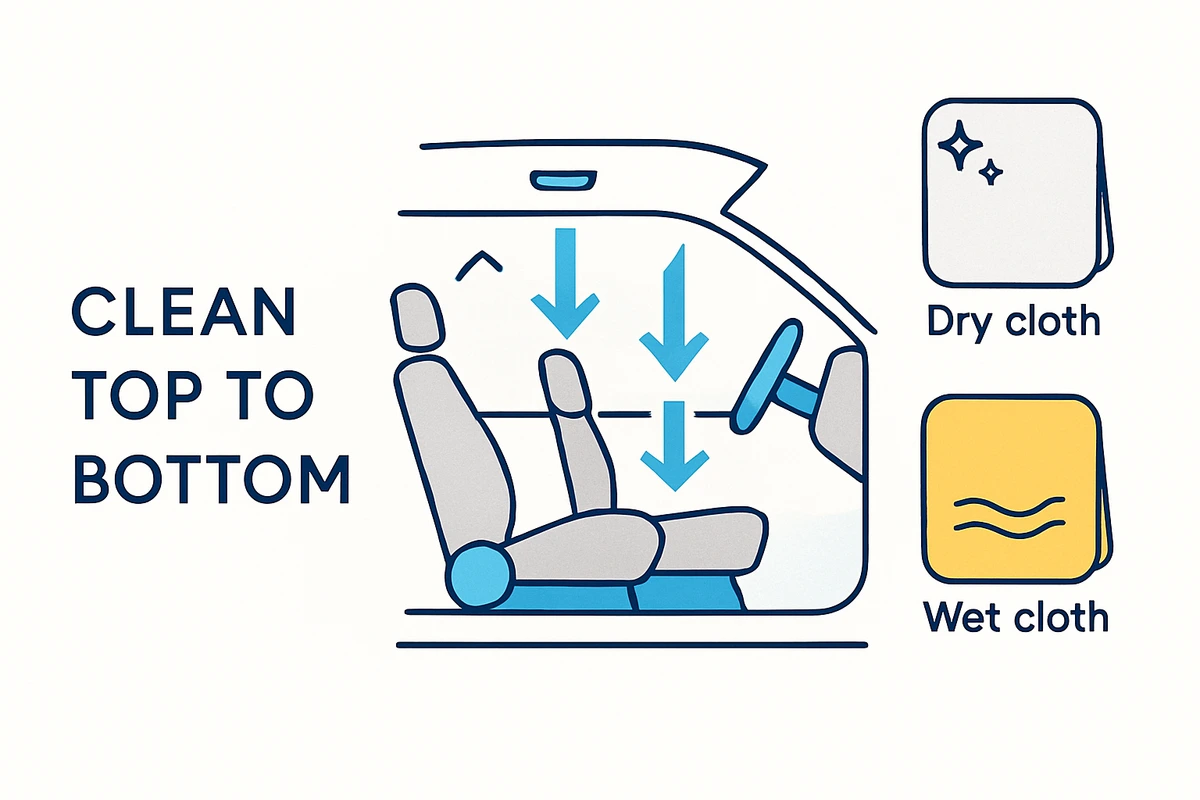
Why home interior cleans take twice as long? Wrong order. Professionals work top to bottom, dry before wet. Nothing they clean gets dirty again from the next step.
Dust falls down. Shampoo the carpets first, then dust the dashboard, and all that dashboard dust lands on your freshly cleaned floor. You just cleaned it twice.
So the order is: declutter, clean the mats, vacuum from top to floor, then wipe surfaces with product. Wet cleaning (sprays and damp cloths) comes after all the dry dirt is gone. A damp cloth on a dusty dashboard just smears mud into every seam.
Here is that sequence in full.
-
1
Declutter and deal with the mats first
Pull out the trash and any loose items, then take the floor mats out of the car entirely. Doing the mats early matters because if you wash them with water they need time to dry while you work on everything else. Shake them out. Carpeted mats: scrub with carpet or upholstery cleaner, rinse. Rubber or silicone: hose down or scrub with warm water and a little dish soap, rinse, air-dry. Set them aside to dry fully. Damp mats in a hot car turn musty fast.
-
2
Vacuum (or brush) from the top down
Mats out, work loose dirt off the seats, then console and dashboard, then carpets. Everything ends on the floor, collected last. A crevice tool reaches the gap between seat and console, and the channel where the windshield meets the dashboard, where crumbs hide. Brushing instead? Same logic: agitate fabric, sweep debris down, clear the floor last.
-
3
Dust and clean the dashboard and hard plastics
The dashboard is the interior's showpiece and dust magnet. It's built from soft-touch plastics and delicate finishes, which is why car-specific products beat generic cleaners. Start dry: soft brush or dry microfiber cloth to lift dust from vents, switches, and seams before any moisture. Loose dust first stops you from turning it into grime the moment you spray.
Then wipe the hard surfaces. For everyday cleaning, a barely damp microfiber cloth or mild all-purpose cleaner handles the dashboard, and a soft-bristled brush works stubborn grime from vents and knobs Toyota. For cup holders, door handles, and other tight spots, a densely bristled brush or old toothbrush reaches where a cloth can't WD-40. Faded plastic trim? Plastic trim cleaner or restorer brings it back.
Here's the warning most guides skip: avoid "shine" sprays that leave the dashboard wet or glossy. That glossy surface throws glare onto your windshield Consumer Reports. A shiny dashboard in the driveway becomes a visibility problem the first time you drive into low sun. Clean and matte beats glossy.
-
4
The console, vents, and touch points
The console, gear area, and door cards take the most hand contact, so they collect the most skin oil and grime. They need cleaning more often than anywhere else. Wipe them with mild cleaner and a microfiber cloth, gentle around sensitive controls like climate and audio buttons. Removable cup holders? Lift them out and wash in warm soapy water.
-
5
Seats — leather and fabric, and the mistake that causes mould
The method is similar for leather and fabric: break down the oils and stains, then lift them away. But the products and aftercare differ.
For leather and vinyl, gentle is the rule. Clean with a soft cloth, a small amount of dish soap and water, then follow with automotive-specific leather conditioner to stop it drying out. That conditioning step isn't optional if you want the leather to last. Leather needs nourishment after cleaning to prevent fading and cracking. Never use bleach or hydrogen peroxide on upholstery.
For fabric seats: spray upholstery cleaner on stains, agitate gently with a soft brush, blot with a clean damp cloth, let them air-dry.
The most common mistake: over-wetting. Don't soak the cushions. Damp padding grows mould and leaves a musty smell that's harder to fix than the stain. Use minimal moisture, blot don't saturate, leave windows open so the moisture dries. In a hot, humid Gulf summer, a seat that never fully dries smells bad within days.
-
6
Interior glass and the mystery windshield haze
This is the step people get most wrong. The questions they ask reveal what guides never explain: why is there a film, how do I get rid of the haze, why does it keep streaking.
The hazy film on the inside of your windshield isn't ordinary dirt. It builds from the inside out: interior vapours and residues settle onto the glass and leave a film that household window cleaner can't remove. Smear that film around and you get streaks and glare. The frustration: people grab their home glass spray, but it's not formulated to cut interior film.
Two fixes. First, use automotive glass cleaner that contains alcohol, not household glass cleaner. The automotive product cuts interior film. Second, use the two-cloth technique: spray onto one microfiber cloth (never the glass) and apply, then wipe clean and dry with a second cloth. Spray the cloth, not the glass. Droplets on the dashboard cause discoloration Kia.
For a genuinely hazed windshield: wipe with dry microfiber to knock off residue, degrease, then finish with glass cleaner on a cloth, dry immediately. Work in one direction so you spot any remaining streaks. On the rear window, skip glass cleaner entirely. It damages the defogger heater lines. Wipe with barely damp cloth instead.
-
7
Touchscreens and displays — different rules from glass
Your infotainment screen looks like glass but isn't. Ammonia-based glass cleaner damages anti-glare and anti-fingerprint coatings. Never spray glass cleaner on a screen. Turn the screen off so you see smudges, then wipe gently with microfiber dampened with isopropyl alcoholor distilled water. Light pressure to avoid scratching, finish with a dry cloth. Same rule for any screen or coated surface in the cabin: no ammonia.
-
8
Deodorize
With everything clean and dry, kill lingering smells at the source. Musty smell? Almost always trapped moisture. Revisit the seats and carpets and make sure nothing stayed damp.
Frequently asked questions
What household products are safe to use on a car interior?
This is the biggest gap in most guides. People ask constantly: what can I safely use from around the house? Dish soap, vinegar, baking soda, alcohol? They get either "use our product" or "anything works." Neither is true. Here's the straight version. Dish soap and water: mostly safe in small amounts. A little in water on a soft cloth is fine for leather and vinyl. Plain soap and water is safe and effective as long as you don't scrub hard. Watch quantity and rinsing: too much soap leaves a film. On leather, always follow with conditioner. Dish soap is a reasonable everyday option. It's not a magic degreaser, but it won't harm most surfaces used gently. Isopropyl (rubbing) alcohol: yes, on hard surfaces and screens. It's a legitimate way to clean hard surfaces and touchscreens without ammonia risk. Keep it off leather, where it dries the surface out. Baking soda: yes, but as a deodorizer, not a scrubbing agent. Its real value is absorbing smells. As an abrasive scrub on delicate trim it's risky, so treat it as an odour tool. What to avoid: bleach, hydrogen peroxide, and ammonia-based cleaners. They damage upholstery and destroy screen coatings. That rules out household glass sprays for screens and "whitening" cleaners on fabric. Remember: many household cleaners contain harsh chemicals that degrade leather, plastics, and cloth. Something being in your cupboard doesn't mean it's safe on a car interior. Household kit summary: dish soap and water, isopropyl alcohol on hard surfaces and screens. Baking soda for smells. Bleach, peroxide, and ammonia stay out.
Is WD-40 (or any shiny dressing) good for the dashboard?
WD-40's own guide recommends coating the whole dashboard with their multi-use product once a week with a soft sponge, letting it break down grime. It cleans and leaves a slick, uniform finish. Plenty of people like it. But here's the caveat enthusiasm leaves out. Any treatment that leaves the dashboard wet or glossy casts glare onto your windshield. In a country with strong low sun, that glare isn't cosmetic. It's a driving-visibility issue. If you like the result, use it sparingly and buff it back to matte instead of glossy, and keep it off the top of the dashboard where it faces the windshield. Matte beats mirror-shiny.
Why does my dashboard get sticky — and how do I stop it?
A sticky dashboard is one of the most-searched complaints and the least-explained. It's two things layering up: body oils, fingerprints, and airborne grime on a surface you touch and sit in the sun, plus residue from previous dressings that have half broken down. The dashboard is a static-charged dust magnet to begin with. That grime bonds to greasy film on the plastic and turns tacky, especially in heat. Strip it back instead of adding shine. Wipe the dashboard thoroughly with mild all-purpose cleaner on microfiber, work a soft brush into textured areas and seams. If needed, go over it again until it's clean and no longer tacky. The mistake: covering stickiness with another coat of dressing. That just adds a layer to break down later. Clean it bare and keep it that way with regular light wipes, not heavy product.
Cleaning a car interior in Kuwait: adapting for heat, sun, and dust

Everything above works anywhere, but a Gulf climate stacks the deck against your interior. Clean with that in mind instead of following advice for mild, damp climates.
Sun and heat are the real enemy of your dashboard and trim. Plastic and vinyl crack and fade from prolonged sun exposure, and most of your interior sits in direct UV all day. In a place where a parked car bakes for hours, it's faster. Park in shade or use a sunshade. Keep leather conditioned, because heat accelerates drying and cracking. Clean surfaces matter here too. Baked-on grime and old dressing degrade faster in intense sun.
Dust and fine sand are relentless. A fast dry dust of the dashboard and vents every week or two keeps it from building into grime that needs a full clean. It's far less work to whisk light dust often than to cut through thick, sun-baked grime later.
Watch moisture, but for the opposite reason. Coastal humidity plus a hot cabin means a seat or carpet that stayed slightly damp turns musty fast. The "never over-wet, always dry fully" rule is even more important here. Use minimal moisture and crack windows so everything dries before you close the car up.
No special products needed. Same method, applied with local conditions in mind: protect against sun, dust often, keep moisture under control.
How often should you actually clean the inside?
No single right answer. A car with kids and pets needs it far more often than one that's just you. Baseline: full deep clean at least twice a year to stay on top of grime, while the inside glass needs monthly cleaning or as needed. High-contact surfaces — steering wheel, shifter, door handles, console — deserve a quick wipe regularly. They're where oils accumulate fastest. Spills don't wait for the schedule: clean them up before they soak in and become stain or smell.
Make the twice-a-year deep clean easier by preventing build-up: light dust of the dashboard, quick wipe of touch points, deal with spills as they happen. The big clean is a refresh, not a rescue.
What doesn't work, and why
Popular moves that create the problems people search for:
- Paper towels on glass and surfaces. They leave lint you then clean off again. Microfiber, every time.
- Household glass cleaner on the inside of the windshield. It can't remove interior film and smears it into streaks and glare. Use automotive, alcohol-based glass cleaner.
- Ammonia-based cleaner on a screen. It wrecks the anti-glare and anti-fingerprint coatings.
- Soaking the seats. Wet padding grows mould and smells musty, worse and harder to fix than the stain.
- Spraying cleaner directly on glass or screens. Overspray lands on the dashboard and discolors it. Spray the cloth.
- Chasing a mirror shine on the dashboard. It looks great until it glares across your windshield. Aim for clean and matte.
The pattern: almost every mistake is a shortcut that creates a second, harder job. The gentle, matched-to-the-surface method isn't just safer. It's genuinely less work over the car's life.
The bottom line
Cleaning a car interior well isn't about owning fifteen products. It's about respecting that the cabin is different materials. Work top-down, dry before wet so you never clean the same thing twice. Match a gentle method to each surface. Know what actually causes damage: soaking seats, ammonia on screens, household spray on the windshield, a glossy dashboard that blinds you. Get those right, control moisture and dust, and the twice-a-year deep clean stays quick. In Kuwait's heat and sun, add extra attention to UV protection and drying. That's all it takes to keep an interior that looks and smells new.
If you'd rather have it done properly without spending your weekend on it, Master Wash offers mobile car washing that comes to your home or office in Kuwait. They handle the interior with the right methods and products for each surface, so your cabin gets cleaned the way this guide describes, without you lifting a cloth.